Note: While I am no longer using Kajabi, I am going to keep this post up for those who want to add pin descriptions to their blog posts on Kajabi.
I’ve been using WordPress for a while and am used to certain things that I can do with plugins on WordPress that I need to figure out how to do on Kajabi.
I’ve decided to write a blog post series on these tasks so that I have the directions for myself as well as for you.
This post contains some affiliate links for your convenience. Click here to read my full disclosure policy.
WordPress Plugin for Pinterest
The plugin I used (and loved) for adding pin descriptions to images on WordPress is called Tasty Pins (which you can get by clicking this link). Tasty Pins makes it so easy to add both data to your images so that they show up in Google correctly and, even better, so that when someone clicks on one of your images to post to Pinterest, that image has a description already tied to it.
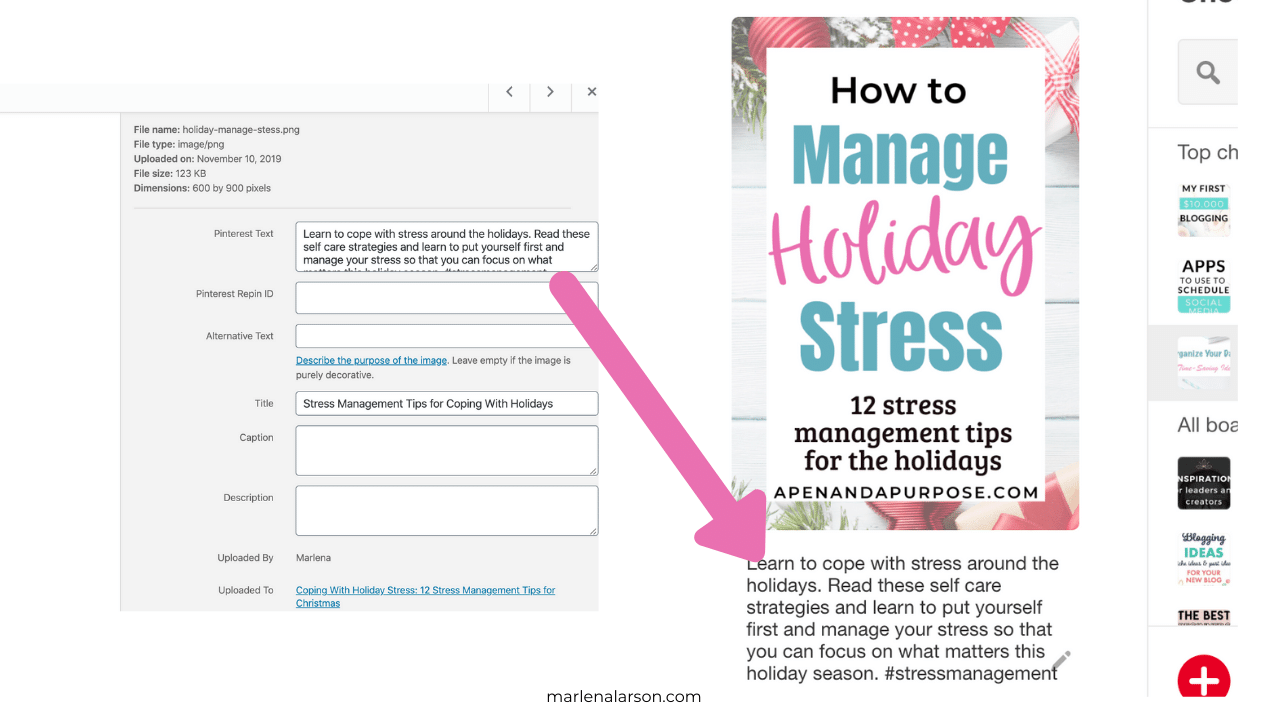
Here is how it works. When you add an image in WordPress Tasty Pins provides you with some areas where you can enter data that becomes associated with that image. I’ve taken a screenshot to show you the two areas I used when using Tasty Pins.

I created an arrow for both sections.
- Pin Description is where you add the pin description you would like to show on Pinterest when someone pins your blog post to Pinterest. This is the BEST part about Tasty Pins.
- Alternative Text is where you describe the picture for Google. My understanding of this is that Google uses the Alternative Text to describe photos for visually impaired individuals. This is also where Google might pick up on on things like keywords in your image. (When you search Google you often will see images as part of the search).
Often people mess up and put the pin description in the alternative text section. Although I think it would work for Pinterest, it puts you at a disadvantage in Google search. So, I recommend making a pin description.
Here is a picture of how the data goes from Tasty Pins to my Pinterest Pin when I click on my Pinterest share button:
How To Add Pinterest Description to Kajabi Picture
Since Kajabi does not use plugins, I had to find out what the code for the picture was so that I could add a pin description and alt text to my images. Here is how this is done.
The first thing to do is to add your Pinterest image to your blog post. In Kajabi, I add these to the bottom of my blog posts so that it doesn’t interfere with the experience of the reader.
To add a picture to Kajabi, you click on “upload image,” which takes you to a screen allowing you to upload a picture from your computer. Once you upload the picture to your blog post, it will show in your blog post.
What you need to do then to create the pin description and alt text, is to click on the button called “source code,” which will allow you to change the code within your post.
Look for the code for your picture. It will start with <img class=
The code for the picture I added as my first screenshot to this post is:
<img src=”https://kajabi-storefronts-production.global.ssl.fastly.net/kajabi-storefronts-production/blogs/18575/images/CqoSwAohSqq6VRV0ZsA5_tasty_pins_screenshot.png”
I named the image on my computer as “tasty_pins_screenshot.png” and when I uploaded it it showed the code above. If I wanted to add a pin description and alt text to that image, I would add the following right after the png” (I suggest you copy and paste this to a notes file so you can grab it whenever you want to add it to your Kajabi post):
alt=“ADD ALT TEXT HERE FOR GOOGLE” width=”600″ height=”900″ data-pin-description=“ADD YOUR PIN DESCRIPTION HERE INCLUDING HAS TAGS” />
So, here is what it would look like:
<img src=”https://kajabi-storefronts-production.global.ssl.fastly.net/kajabi-storefronts-production/blogs/18575/images/CqoSwAohSqq6VRV0ZsA5_tasty_pins_screenshot.png” alt=“ADD ALT TEXT HERE FOR GOOGLE” width=”600″ height=”900″ data-pin-description=“ADD YOUR PIN DESCRIPTION HERE INCLUDING HAS TAGS” />
I would change the text to what I would want to populate on Pinterest (pin description) and on Google (alt text). The width and height in there is the width and height of a pin made on Canva.
An Example:
First, I went to Canva to create my new pin image. I created it at the size 600 px by 900 px. I will upload it at the bottom of this post.
To do so, I will click on the Upload Image button here (see pink arrow):

I will insert the image and then click on the source code button as shown below:

When I click on source code, it is going to show me a bunch of code. I want to look for the image I would like to use on Pinterest (which should be at the end of your post).
Here is what you are looking for (see highlighted):

Next, go find the code you copied earlier so you can add it in.
Mine will look like this:
alt=“ADD ALT TEXT HERE FOR GOOGLE” width=”735″ height=”1102″ data-pin-description=“ADD YOUR PIN DESCRIPTION HERE INCLUDING HAS TAGS”
I will add that after the code that is on my Kajabi image, like this. The gray highlights show how I added the alt text and the pin description to my pin at the bottom of my post:

Now it is time to test it! I always test to make sure things work prior to finally publishing. I’d rather know now than to have to fix it after pinning. So I will save the post and attempt a pin.
I learned that you should probably copy and paste the highlighted section above into a word processor prior to saving. I had something off the first time and had to redo it. All of the spaces and such matter in coding, so if it is off, it won’t work correctly. The one above does work correctly. I’ll paste it below so you can use it. The purple part is what I added:
<p><img src=”https://kajabi-storefronts-production.global.ssl.fastly.net/kajabi-storefronts-production/blogs/18575/images/lGNhXVu6RFeuCKMlC8ZT_Kajabi_Pinterest.png” alt=”How to Add Pin Descriptions to Kajabi Images” width=”600″ height=”900″ data-pin-description=”Thinking of switching to Kajabi but worried about how to set up your images on Pinterest so that your pin descriptions populate on your pins? I’ve got you! I figured it out so I could share it with you. Click now to learn how to change hte code on your images so you can add pin descriptions to your images. #kajabi #kajabiimages #pinterest” /></p>
How Does Pinning Work?
Save your post and make it live. Then go in and click to share on Pinterest. (I use Chrome so am using my Chrome extension to do this).
Pick the image you want to pin and YAY it worked!

Next step is to add code so that the images you do not want to pin do not show up. Stay tuned! By the way, if you found this helpful, please pin and share this post!